Infrared Photos In Lightroom
I came across this excellent Gimp infrared tutorial not long ago, and it got me excited to try some infrared photo processing. Being a recent Lightroom addict, I found it annoying that Lightroom does not support color channel mixing, and having to constantly export-edit-import slowed my workflow.
In doing a bit of research on a solution to this, I discovered the magical world of Lightroom plugins! First, I must give a huge thanks to user ST8_ in this Flickr thread about color channel swapping inside Lightroom, where he provides a Lightroom plugin RBSwap that exports a photo to Gimp to swap the red and blue channels.
![]() +
+![]()
This was my first experience on the programmer’s side of Lightroom plugins, and sent me on a wild tangent on learning about Lightroom plugin development – reading up on the Lightroom SDK – learning how Lightroom plugins work – and experimenting with my own.
Basically, LR plugins are a collection of Lua scripts that import and use LR SDK libraries, and all have a pretty basic/common structure (for more info read this).
I decided after looking at the examples included with the LR SDK, that ST8_’s RBSwap plugin actually makes a really nice template for exporting photos from Lightroom to another application.
So, as a learning exercise I took ST8_’s Lightroom plugin and re-worked it a bit to use ImageMagick swap the color channels. I leave the the option to choose Gimp or ImageMagick, and do some simple code formatting/cleanup.
Checkout my Lightroom channel swap plugin source on Google Code!
Or Download a zip of RBSwap.lrplugin.
RBSwap Installation (on a mac)
- Download the whole Lightroom infrared folder
- Place RBSwap.lrpdevplugin in ~/Library/Application Support/Adobe/Lightroom/Modules/
- Install Gimp and/or ImageMagick
- Edit RBSwapExportServiceProvider.lua to choose Gimp *or* ImageMagick
- ImageMagick (convert) is current default. If using Gimp, place the red_blue_swap.scm script ~/Library/Application Support/Gimp/scripts/
Note: If you want just use the command line for swapping color channels instead of Lightroom, here is how for Gimp and ImageMagick, respectively:
$ gimp -i -b '(red_blue_swap img.jpg )' -b '(gimp-quit 0)'")

$ convert img.jpg -set colorspace RGB -separate -swap 0,2 -combine img.jpg
Running
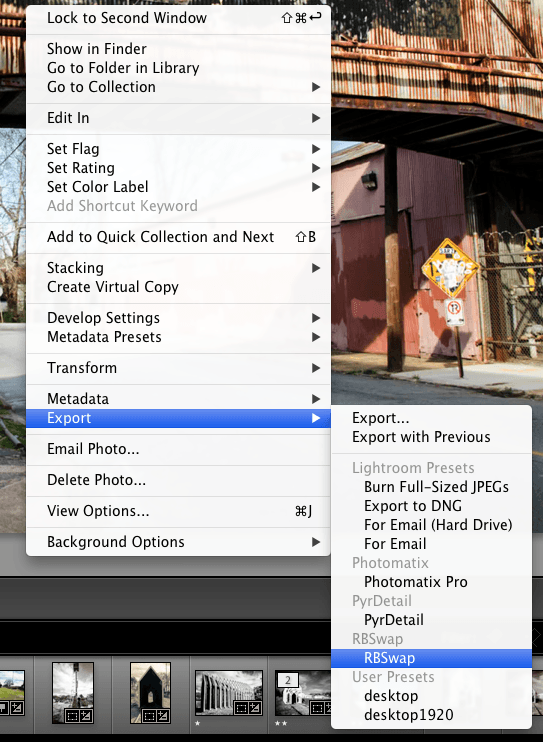
After installing the plugin and restarting Lightroom, simply right click any photo, choose Export > RBSwap

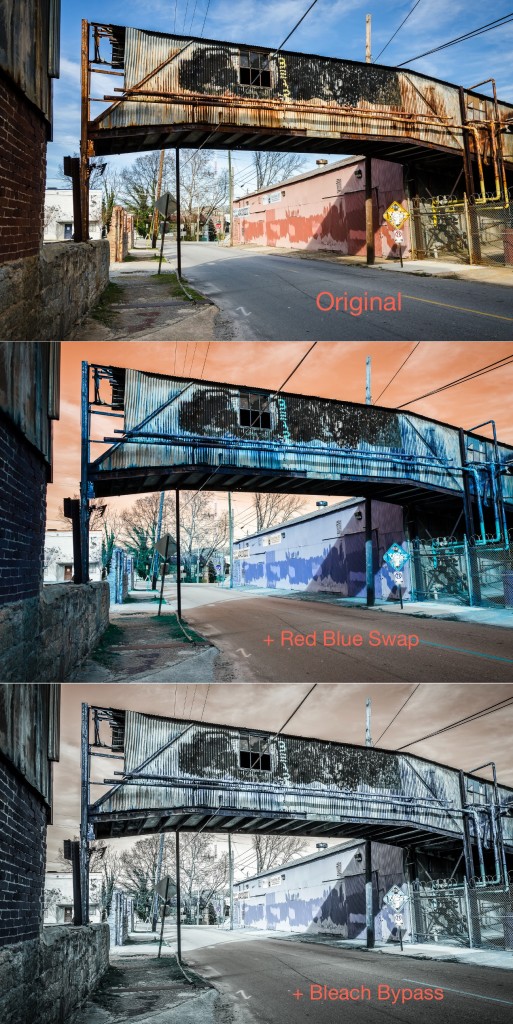
The following is an example infrared image workflow, all done in Lightroom!

Export to PyrDetail
Taking what I’ve learned above, and using the RBSwap as a nice LR4 plugin template, I created another plugin to export photos into my image manipulation app: pyr_detail.

Get the files for my PyrDetail LR export plugin [source] on Google Code!
Or Download the [zip].
Installation is similar to above, and the path to pyr_detail needs to be modified inside the script (see the Readme). Also note, that this plugin is really just for me, as installing and running PyrDetail is shamefully not as easy as I would like (need to have OpenCV installed, etc), but please try it out!
Media
Here is a video of what that the pyrdetail Lightroom plugin looks like in action:
TL;DR
I just discovered how to make simple plugins for Lightroom, and want to continue learning how to make more with better features.
Looks interesting! I have yet to discover the world of lightroom plugins
Hello, My company needs to update a product that uses our color card and a script for ACR to create a custom color profile for the user.
We are looking for a LR developer to work with. Would you be able to help us find someone?
Henry DeGroot
DGK Color Tools
If anyone figures out how to get this IR swap plugin working on Windows, let me know dustin.main at gmail.com
Update:
Special thanks to Frank Firsching for getting the RBSwap plugin to work in Windows!
See the updated version here: https://code.google.com/p/mcclanahoochie/source/browse/#git%2Flightroom%2Finfrared%2FRBSwap.lrdevplugin
or download here https://www.dropbox.com/s/vf3phguakp79lkp/lr_infrared.zip?dl=0
Thanks!
I’ve spent hours trying to get the Red Blue channel swap to work using imagemagick 7.0.7 and the ‘RBSwap.lrplugin’ plugin (with LR 6 & WIn 10 1709).
The imagemagick command itself works fine when carried out from a Powershell command window.
i.e:-
convert img.jpg -set colorspace RGB -separate -swap 0,2 -combine img.jpg
or
magick img.jpg -set colorspace RGB -separate -swap 0,2 -combine img.jpg
However, when I try to do this from within the RBSwap.lrplugin lua script, the resulting exported jpg file does not have the channels swapped.
I’ve tried all sorts of combinations of escape sequences and quotes to allow for spaces in the filePath. I’ve tried adding the full path to the imagemagick executable. Nothing I have tried works.
For example:-
local filePath = assert(pathOrMessage)
local cmd = “cmd.exe /c \”C:\\Program\ Files\\ImageMagick-7.0.7-Q16\\magick.exe ” .. filePath .. ” -set colorspace RGB -separate -swap 0,2 -combine ” .. filePath .. “\””
result = LrTasks.execute(cmd)
I’ve tried calling error(cmd) to view the actual command string passed to cmd.exe in an attempt to debug the problem.
I can see nothing obviously wrong. I am baffled.
Hi brian,
Disclaimer: I don’t have a windows box to test this with…
When you print the ‘error(cmd)’ message, and copy that exactly to a regular windows terminal, everything still works? I believe Powershell has a different default environment than the regular cmd.exe. Since things work with powershell, you could try calling powershell.exe (or whatever the powershell exe is) instead of cmd.exe. Also, try adding C:\\Program\ Files\\ImageMagick-7.0.7-Q16 to your system path, then you can just have convert or magick in your command script (instead of the full path).
Hope that helps, Thanks for giving it a try!